This has already been done several times, and unfortunately what it really needs is a video to demo how to turn it right side out as photos just cannot convey (done!), but redundancy never hurt anybody, right?
Back in the Olden Dayes, commercial pattern companies had you go to ridiculous contortions to line a sleeveless dress. You were to sew the fashion and lining fabrics together at the neckline and armscye to within a few inches of the shoulder. Then you were to try to roll out the fabric and hold it steady to put in a straight shoulder seam. Then you had to finish the shoulder by hand. Ridiculous!
There is a new, modern way to do this all by machine with no hand futzing at the end.
Requirements: Your pattern must have a center back or front seam and two side seams. Three open seams are required, otherwise the geometry of this won't work and you'll find yourself with an endless tube resembling a Mobius strip or a water weenie.
For a pattern not suitable for this technique, such as with both the front and back cut on the fold, see this alternative method that involves only a little bit of easy hand sewing.
First: Sew the shoulder seams of your fashion and lining fabrics. Finish and press. Do NOT sew the side seams. Your two side seams and front or back seam remain open.
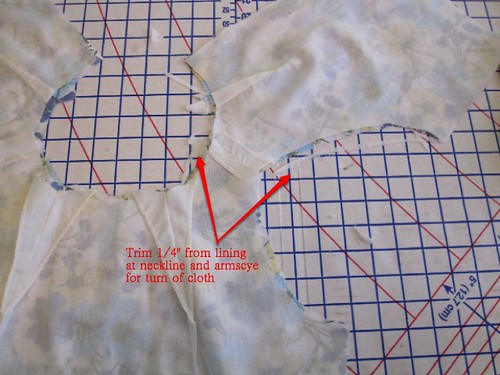
Second: Trim 1/4" or 1/8" (or the skinniest you can go) from the neckline and armscye of your lining. This makes your lining smaller than your fashion fabric. The lining will automatically roll to the inside when the two pieces are sewn together, for a nicer look.
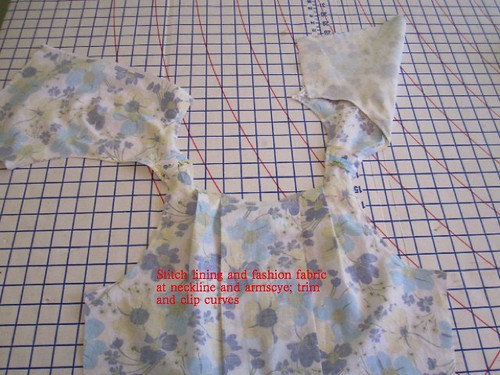
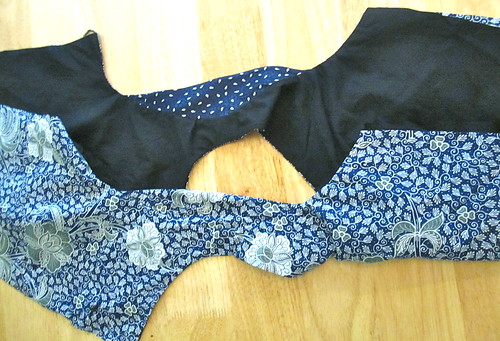
Third: Sew your fashion and lining fabrics right sides together at the neckline and armscyes. Trim close to stitching at curves (I use my serger). You may need to clip into the curves.
Fourth: Pull the bodice right sides out through the shoulder tunnels, as described in this video:
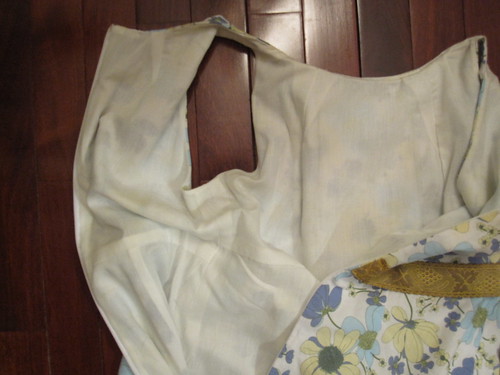
Here's a still photo representation and this is what it looks like when half turned right side out.
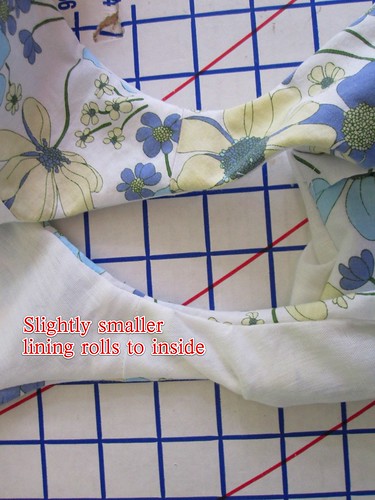
Fifth: You can see that even before pressing, the lining is pulling itself under to the inside (here's a view before it's turned). Press. Understitch if needed. Your trim job on the lining should eliminate the need for understitching, but it is not always enough.
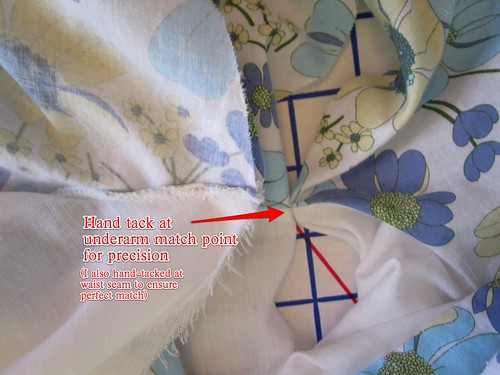
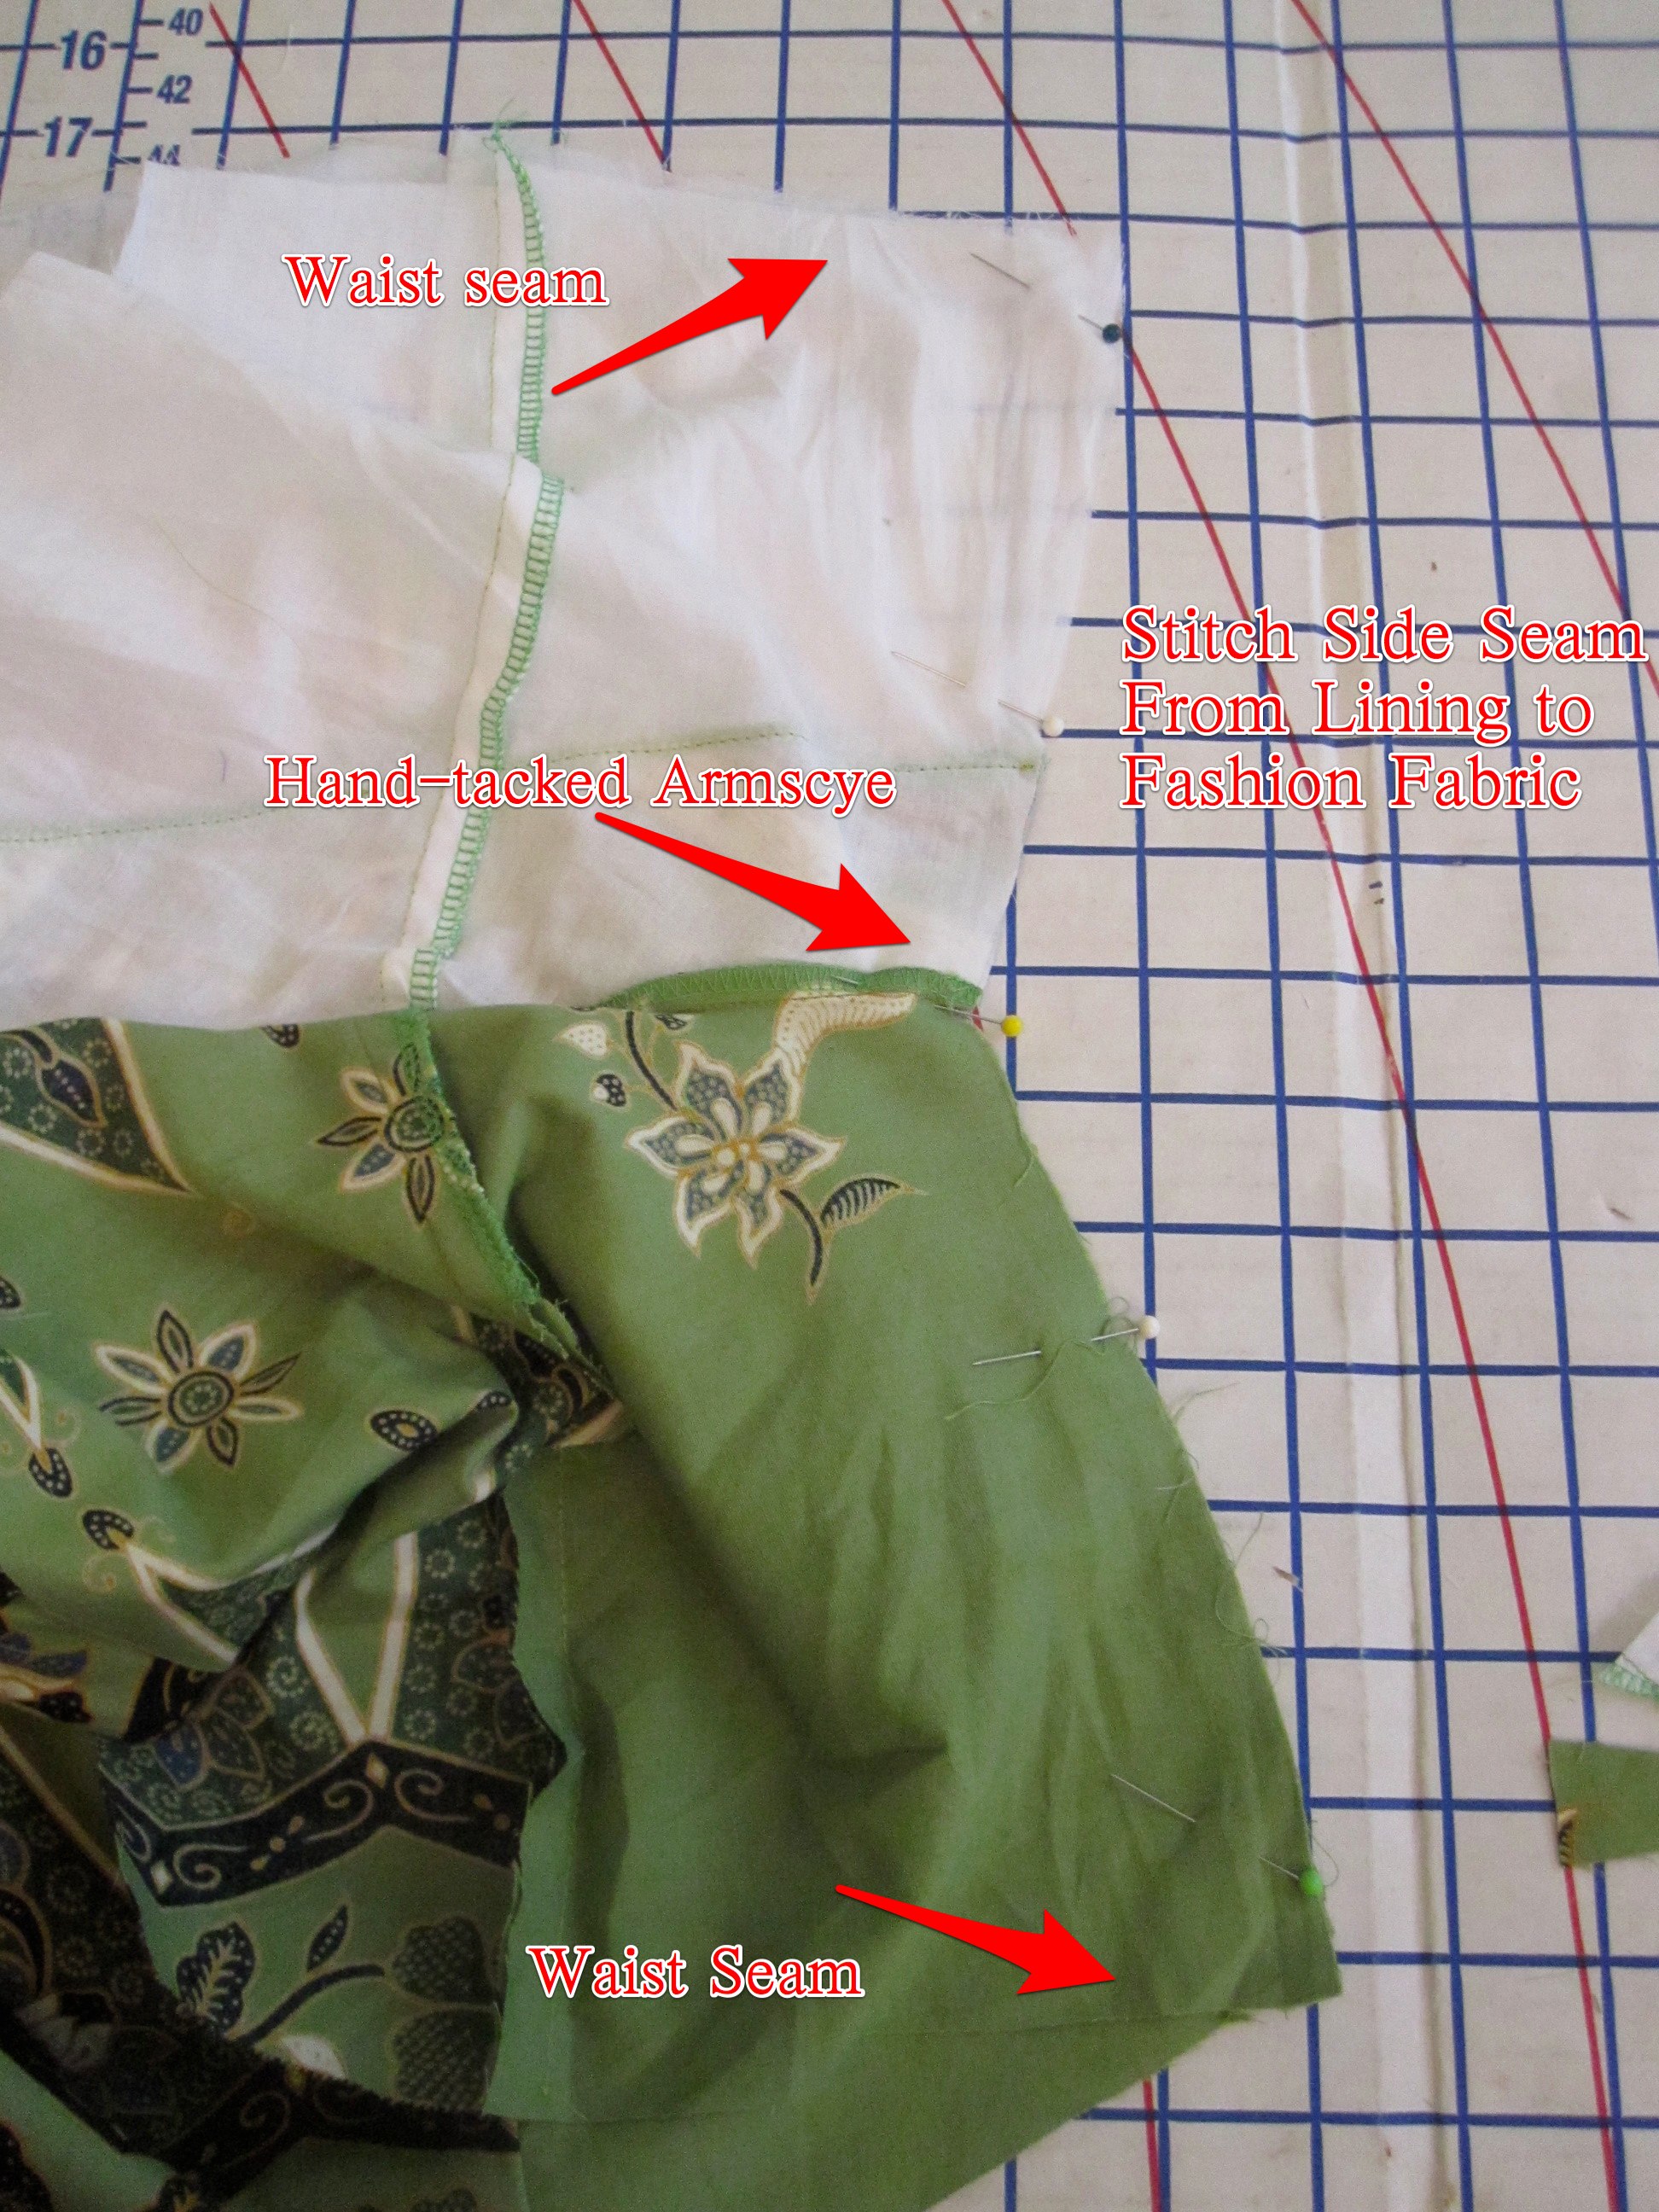
Sixth: Hand tack at the underarm to ensure perfect matchup at the seam. I don't find it necessary to baste the whole seam, just that junction (and the waist seam and/or midriff junction, if there is one). Your hand tack will ensure that the underarm match point doesn't shift.
If you are inserting the zip into one of the sides, do the hand-tack at the back or front and one of the sides, sew one side seam and the back or front seam, and then insert the zip into the remaining open seam.
Seventh, sew the side seams "all at once"--one continuous stitching line from the lining to the fashion fabric. Pin and stitch the side seams, from the lower edge of the lining to the lower edge of the fashion fabric.
And voila! A beautifully finished bodice with no* hand-sewing.
*Ok, you've got me. Almost no hand sewing. You can skip the hand tack at the underam if a perfectly precise matchup isn't important to you, but it takes about 15 seconds and it's worth it to me.
To clean-finish by machine at your zipper, visit this tutorial I posted previously.
And here it is once the zipper is installed, a thing of beauty to behold! The completed dress is here.
====================================
Cap Sleeve Variation
This method can be used with a cap sleeve. However, you must consider the bulk of your cap sleeve against the width of your shoulder strap. The narrower the shoulder, the tighter the squeeze and the smaller the cap sleeve must be. For the project pictured above, I had a hard time pulling the bulk of the sleeve through the strap tunnel--I used a large safety pin to give me some grip.
First, finish your sleeve's hem. In my case, I lined the sleeve. Finishing the hem before attaching is the normal procedure for any cap sleeve that does not reach the armscye, so this will be in your pattern's instructions.
Second, stitch the cap sleeve into the armscye, again as directed by your instructions. Do not serge off the seam allowances. Remember, at this point the shoulder seams should be sewn but the side seams and front or back seam must be left open.
Third, fold the cap sleeve toward the bodice, right sides together, so the seam allowance extends. This is what you did when you sewed the cap sleeve--sleeve right sides together against the bodice. Pin and stitch your lining to the armscye and neckline seam allowances as described above, like normal, enclosing the cap sleeve When you pull the fabric through the strap tunnel to the right side, your cap sleeve will pop out.
I am not aware of any way to use this method with a full sleeve. For a full sleeve where the sleeve is not lined, if you want to enclose the seam allowances inside the lining, first stitch the fashion fabric and lining together at the neckline. Clip the neckline and turn the lining to the inside. Set in the sleeve. Then at the armscye turn the lining's seam allowance under and stitch in place by hand to the armscye seam allowance. It will be easier to do this if you set the sleeve in the flat.
Back in the Olden Dayes, commercial pattern companies had you go to ridiculous contortions to line a sleeveless dress. You were to sew the fashion and lining fabrics together at the neckline and armscye to within a few inches of the shoulder. Then you were to try to roll out the fabric and hold it steady to put in a straight shoulder seam. Then you had to finish the shoulder by hand. Ridiculous!
There is a new, modern way to do this all by machine with no hand futzing at the end.
Requirements: Your pattern must have a center back or front seam and two side seams. Three open seams are required, otherwise the geometry of this won't work and you'll find yourself with an endless tube resembling a Mobius strip or a water weenie.
For a pattern not suitable for this technique, such as with both the front and back cut on the fold, see this alternative method that involves only a little bit of easy hand sewing.
First: Sew the shoulder seams of your fashion and lining fabrics. Finish and press. Do NOT sew the side seams. Your two side seams and front or back seam remain open.
Second: Trim 1/4" or 1/8" (or the skinniest you can go) from the neckline and armscye of your lining. This makes your lining smaller than your fashion fabric. The lining will automatically roll to the inside when the two pieces are sewn together, for a nicer look.
Third: Sew your fashion and lining fabrics right sides together at the neckline and armscyes. Trim close to stitching at curves (I use my serger). You may need to clip into the curves.
Fourth: Pull the bodice right sides out through the shoulder tunnels, as described in this video:
Here's a still photo representation and this is what it looks like when half turned right side out.
Fifth: You can see that even before pressing, the lining is pulling itself under to the inside (here's a view before it's turned). Press. Understitch if needed. Your trim job on the lining should eliminate the need for understitching, but it is not always enough.
Sixth: Hand tack at the underarm to ensure perfect matchup at the seam. I don't find it necessary to baste the whole seam, just that junction (and the waist seam and/or midriff junction, if there is one). Your hand tack will ensure that the underarm match point doesn't shift.
If you are inserting the zip into one of the sides, do the hand-tack at the back or front and one of the sides, sew one side seam and the back or front seam, and then insert the zip into the remaining open seam.
Seventh, sew the side seams "all at once"--one continuous stitching line from the lining to the fashion fabric. Pin and stitch the side seams, from the lower edge of the lining to the lower edge of the fashion fabric.
And voila! A beautifully finished bodice with no* hand-sewing.
*Ok, you've got me. Almost no hand sewing. You can skip the hand tack at the underam if a perfectly precise matchup isn't important to you, but it takes about 15 seconds and it's worth it to me.
To clean-finish by machine at your zipper, visit this tutorial I posted previously.
And here it is once the zipper is installed, a thing of beauty to behold! The completed dress is here.
====================================
Cap Sleeve Variation
This method can be used with a cap sleeve. However, you must consider the bulk of your cap sleeve against the width of your shoulder strap. The narrower the shoulder, the tighter the squeeze and the smaller the cap sleeve must be. For the project pictured above, I had a hard time pulling the bulk of the sleeve through the strap tunnel--I used a large safety pin to give me some grip.
First, finish your sleeve's hem. In my case, I lined the sleeve. Finishing the hem before attaching is the normal procedure for any cap sleeve that does not reach the armscye, so this will be in your pattern's instructions.
Second, stitch the cap sleeve into the armscye, again as directed by your instructions. Do not serge off the seam allowances. Remember, at this point the shoulder seams should be sewn but the side seams and front or back seam must be left open.
Third, fold the cap sleeve toward the bodice, right sides together, so the seam allowance extends. This is what you did when you sewed the cap sleeve--sleeve right sides together against the bodice. Pin and stitch your lining to the armscye and neckline seam allowances as described above, like normal, enclosing the cap sleeve When you pull the fabric through the strap tunnel to the right side, your cap sleeve will pop out.
I am not aware of any way to use this method with a full sleeve. For a full sleeve where the sleeve is not lined, if you want to enclose the seam allowances inside the lining, first stitch the fashion fabric and lining together at the neckline. Clip the neckline and turn the lining to the inside. Set in the sleeve. Then at the armscye turn the lining's seam allowance under and stitch in place by hand to the armscye seam allowance. It will be easier to do this if you set the sleeve in the flat.


.jpg)


43 comments:
Great tutorial!
I LMAO'd at the Water Weenie reference; I turned several versions of my wedding dress mock-up bodice into water weenies while trying to figure out how to do what you've shown so nicely here!
Don't ask how I know about the endless Water Weenie experience. Thanks for the clear explanation. I didn't think of the armhole hand tack, but not matching would bother me so I would do it.
Thanks for posting this tutorial! It will come in handy someday when I work up enough courage to sew a woven dress instead of a knit one.
Grrr! I'm "C"...Sorry about that!
This is a great tutorial. Thanks for sharing it!
This is the method that Butterick uses for the sheath dress 5147 pattern. I love it. However they neglected to mention your tip about cutting the lining slightly smaller. Thanks!!! Can't wait to see this project finished I love the fabric.
Great tutorial, thanks. It's always hard to explain about Moebius strips and their topological invariability :-)..
Brilliant. Thank you for taking the time, energy, and interrupting your sewing time to help us.
Thankyou so very much for taking the time to do this !!! I might even be able to manage this . Tell me if you are making a dress with a side zip do you simply move the zip position so you can use this technique ?
So happy I found your blog. I have successfully done this before but now I have a great tutorial so if my brain decides to take a break, which it dones from time to time I have you to thank for getting my through to the end.
Thanks so much!
Great tutorial!
Thanks, I've got a dress hanging up in here that I need to use that technique on.
Great tutorial! I know what you mean about needing a video, but. you really did a great job explaining this technique.
Excellent tutorial, it drives me nuts that patterns still have instructions the old way. Even nuttier is that I sometimes follow them, I have a ufo dress that I think I'm just going to unpick and do this way.
Thank you so much. I have been struggling mightily with linings and this is exactly what I needed. Thank goodness for generous sewists like you who share the wealth of knowledge!
Thanks for the tutorial. I'm definitely going to have it open the next time I try this.
Thank you for the tutorial. I love the fabric - - appropriate summer fabric.
I can never get my head around these three-dimensional sew- and turn processes, so I'm thankful for every tutorial I can find! I can usually follow those, but just don't get the logic behind it... hmmm. Good thing I'm not an engineer!
tjank you for this - there's room for another tutorial because one always picks up something new. I've been using this method for a while, but never thought to trim the lining as per your step #2 - but I will be from now on!
Thank you so much for this. I'm always thankful for tipps how to avoid handsewing! I will definetly try this on my next dress.
Thankyou so much for answering my question about zipper placement ! I really appreciate it .
Thank you for sharing this tutorial --- the photos are really helpful!
Perfect!!!!! I've been wanting a clear explanation for a dress that I'm changing from one with sleeves, to a sleeveless fully lined dress. Thank you!!!
TQSM .. I love the link about the invvisible zipper & also this tutorial really help me with my daughter dress .. TQ again :)
Great tutorial.
I wish i had seen your blog post before I attempted to sew the bodice on to my dress fabric!! I lookied all day on google for a tutorial and couldn't find one. So i attempted it with no idea! I had stitched the side seams on lining and fabric and sewed the neck and both arm holes and could not reverse it! Kept getting the "water weenie". I was so frustrated, had to unpick it all! Was going to give up, but tried google again an came across your blog! I was up till 2am unpicking the side seams.. all god now!
THANK YOU SO MUCH
www.sewmelove.blogspot.com
Awesome! Awesome! Awesome!
The instructions in vogue patter are horrible for the lining, this tutorial saved me lots of time and horrible understitching that looked like a home-made finish.
Thaaanks! :)
Great tutorial! Thanks! :)
I too have a question, what about a dress with side zipper? Does it work? :)
Girasole, it can be done in a dress with a side zipper, BUT the dress has to have either a center back or side back seam.
What if I have the zipper on the side? How do I do it?
Anonymous, there is link above for a pattern not suitable to this technique. http://theslapdashsewist.blogspot.com/2012/06/alternative-finish-for-sleeveless-lined.html
I always enjoy your detailed reviews and often credit this tutorial as a superior construction method when reviewing sleeveless dress patterns. Unfortunately I'm experiencing a bit of a brain fart on my current project. I'm sewing New Look 6968 with a 3/4 length sleeve and fully lining the body of the dress (sleeves left unlined). I want to do a flat sleeve assembly and full machine insertion of the fashion and lining fabric. I just can't seem to visualize the process for some reason. Ideally I would like to enclose the armsyce seam, but if this is not possible am not opposed to serging through all layers for a reasonable interior finish. PLEASE HELP!!
Michelle, I've been meaning to update this post with the cap sleeve variation for a while so thanks for the prompt. Unfortunately, as I added to the post, I don't know any way to do this with a full sleeve. There is just too much bulk to fold it in unless you have very thin fabric (such as silk chiffon) and a wide shoulder.
You can either finish the neckline and from there on treat the lining and fashion fabric as one at the armscye, so you have the exposed seam allowance (this is generally what I do if I'm not lining the sleeve due to laziness and the fact that it is inside the garment). Or you can hand-stitch the lining's turned-under seam allowance in place at the armscye to enclose the seam allowances.
Thank you so much! It worked beautifully and your instructions were crystal clear.
Just want to add my thanks. I used your fabulous tutorial on a vintage pattern with ridiculous instructions and the results were beautiful!
This is an awesome tutorial! I just used it to finish a plaid shift dress, with no problems. Definitley easier than the way that Burda instructed me to insert a lining. Obviously.
Thank you, thank you, thank you! I went through three horribly frustrating mock-up bodices before I found this tutorial. You make the process so much easier than the commercial instructions! Much applause!
Thank you so much, I did this for a linen dress that would have been a little too sheer in sunlight. Worked great!
Wow, THANKS!
This is great, thanks for sharing! I don't usually line knits but have a thin knit fabric that I want to line the bodice of. Any idea if it will work with the lining rolling to the inside like it does with a woven? Have you tried this with a knit fabric?
Hi Ashley-
Glad you enjoyed the tutorial! I have done this with knits. I usually use a powermesh type fabric to line knits and this technique works just as well.
I have been sewing for over 60 years and your video was top notch... You have shown an old dog a new trick as I could never figure out how to turn the fabric right side out. Thank you for taking the time to do the video. Your written instructions are the best I have ever read and used.
This really helped me. Thank you!
Post a Comment